
SHOOTING MODES
The best place to start is with shooting modes.
|
· aperture priority
· shutter priority · program · manual |
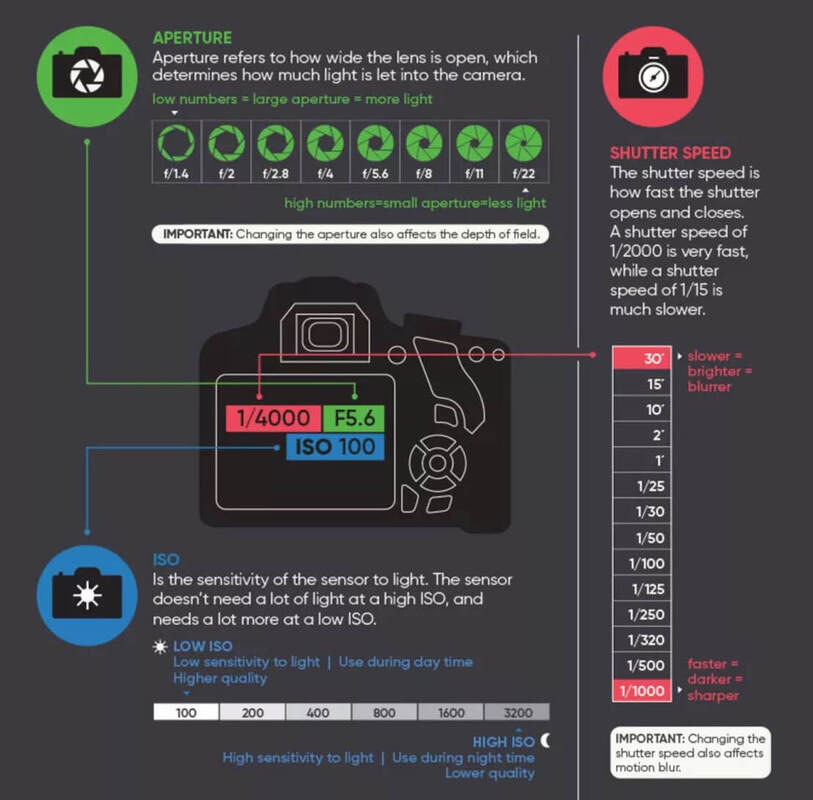
Aperture, shutter speed, and ISO are the three most important elements of photography. They work together to create a properly exposed image.
Aperture is the opening in the lens through which light enters the camera. It is measured in f-stops, with smaller numbers indicating larger openings. A larger aperture allows more light to enter the camera, which is useful in low-light situations. Aperture also affects the depth of field, or the range of distance that appears sharp in the image. A smaller aperture (larger f-stop number) will result in a larger depth of field, while a larger aperture (smaller f-stop number) will result in a shallower depth of field.
Shutter speed is the amount of time that the camera’s shutter is open. It is measured in fractions of a second, with faster shutter speeds allowing less light to enter the camera. A faster shutter speed is useful for freezing motion, while a slower shutter speed can create a sense of motion blur.
ISO measures the sensitivity of the camera’s sensor to light. A higher ISO setting allows the camera to capture more light, which is useful in low-light situations. However, a higher ISO setting also increases the amount of digital noise in the image, which can result in a grainy appearance.
In summary, aperture, shutter speed, and ISO work together to control the amount of light that enters the camera and how that light is captured. By adjusting these settings, photographers can create a properly exposed image that captures the desired depth of field and motion blur while minimizing digital noise
The shooting modes will most likely be found on a dial labelled with auto, Av, Tv, P, M and maybe more. Selecting a shooting mode will determine how your camera behaves when you press the shutter, for example, when is selected, the camera will determine everything to do with the exposure, including the aperture and shutter speed. The other modes, Av, Tv, P, M, are there to give you control.
Don’t worry if your mode dial looks a little different; different manufacturers use different abbreviations for the shooting modes. Your mode dial may have the letters ‘A, S, P, M’ (instead of Av, Tv, P, M), yet they all function in the same way.
a) Aperture Priority (Av or A)
Aperture priority can be thought of as a semi-automatic shooting mode. When this is selected, you as the photographer set the aperture and the camera will automatically select the shutter speed. For Canon, it's called "Av" (for Aperture value) on your mode dial while for Nikon, it's called "A".
So what is aperture and when would you want to control it?
The aperture is the size of the opening in the lens through which light is allowed to pass whenever the shutter is opened. The smaller aperture lets less light onto the sensor than the larger one would have, forcing the camera to compensate for this by using a slower shutter speed. This is what "aperture priority" exposure control is about.
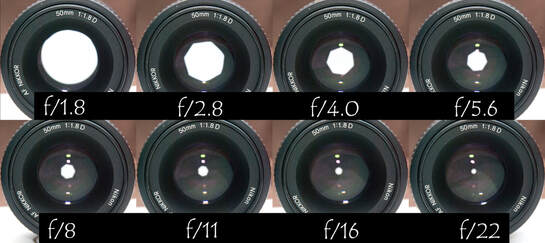
Av mode forces the aperture to take priority and the camera will only adjust the shutter speed. The aperture is measured in and is usually displayed using an e.g. f/2.0, f/2.8, f/4.0, f/5.6, f/8.0 etc., which is a ratio of focal length over diameter of the opening Therefore, a larger aperture (a wider opening) has a smaller f-number (e.g. f/2.0) and smaller aperture (a narrower opening) has a larger f-number (e.g. f/22). Reducing the aperture by one whole f-stop, e.g. f/2.0 to f2/8 or f/5.6 to f/8.0, halves the amount of light entering the camera.
Aperture is one of the most important aspects of photography as it directly influences the depth of field that is, the amount of an image that is in focus. A large depth of field (achieved by using a small aperture (large f-number)) would mean that a large distance within the scene is in focus, such as the foreground to the background of the landscape below.
So, if you want to make a subject stand out from the background, use a large aperture (small f-number) to blur the background (soft and out of focus). If you need to get more of your scene in focus, use a smaller aperture.
.
There is a trade-off between depth of field and low-light performance. You can either have a wide open aperture, which will give you little depth of field but plenty of light onto the sensor, or a smaller one, which will do the opposite. There are also problems with diffraction effects stealing sharpness at very small apertures; as a general rule, don't use one smaller (remember: larger number!) than f/8 or f/11 unless extreme depth of field is really needed.
b) Shutter Priority (Tv or S)

Similarly to aperture priority, this is another semi-automatic shooting mode, though in this instance, you as the photographer set the shutter speed and the camera will take care of the aperture. The shutter speed, measured in seconds (or more often fractions of a second), is the amount of time the shutter stays open when taking a photograph. The longer the shutter stays open, the more light passes through to the sensor to be captured.
You would select a short shutter speed if you wanted to freeze a fast moving subject, such as shooting sports, action or wildlife, for example:
- A very fast shutter speed of 1/4000th sec was used to freeze the motion
You would use a long shutter speed if you wanted to blur a moving subject, for example water rushing over a waterfall. The photo with the fast shutter speed will be darker. This can either be a good or bad thing, depending on lighting conditions.
The photo at the slower shutter speed might show some motion blur if you were holding it by hand. Slower shutter speeds will require you to put the camera on a tripod to ensure the camera is held steady whilst the shutter is open.
In very dark conditions, you will need to use a slower shutter speed; but such slow shutter speeds can cause motion blur because of camera shake...
In brighter conditions, you will need to use a faster shutter speed, which will have the effect of freezing motion. This can be a good thing or a bad thing. If you need to get a longer exposure during the daytime, use an ND filter.
Aperture and shutter priority shooting modes may be semi-automatic, meaning that some may derive their use because they’re not fully manual, however they are incredibly useful modes to shoot in that can give you enough creative control to capture scenes as you envisage them.
c) Program (P)
In program mode, you are able to set either the aperture or shutter speed, and the camera will maintain the correct exposure by adjusting the other one accordingly - as you change the aperture, the shutter speed will automatically change, and vice versa. This gives you additional freedom that using either aperture priority or shutter priority cannot give without switching between shooting modes.
d) Manual (M)
Manual mode is exactly what it sounds like, you are given full control over the exposure determination, setting both the aperture and shutter speed yourself. There will be an exposure indicator either within the viewfinder or on the screen that will tell you how under/over exposed the image will be, however, you are left to change the shutter speed and aperture yourself to ensure you achieve the correct exposure.
Camera Simulation
Practice using DSLR simulator below. Make three good images:
1. AV Mode
2. TV Mode
3. Manual Mode
Adjust the ISO and Lighting however you like - as long as you get this:
1. AV Mode
2. TV Mode
3. Manual Mode
Adjust the ISO and Lighting however you like - as long as you get this:
Make a screenshot for each one
1 - Use Left Shift+ Command + 4 then drag a square around it - the screenshot will appear on the right side of your desktop.
2 - Right click on each image on the desktop and select Rename and change the name from Screenshot to Shot1 Shot2 Shot3
3 - Upload to Canvas
1 - Use Left Shift+ Command + 4 then drag a square around it - the screenshot will appear on the right side of your desktop.
2 - Right click on each image on the desktop and select Rename and change the name from Screenshot to Shot1 Shot2 Shot3
3 - Upload to Canvas
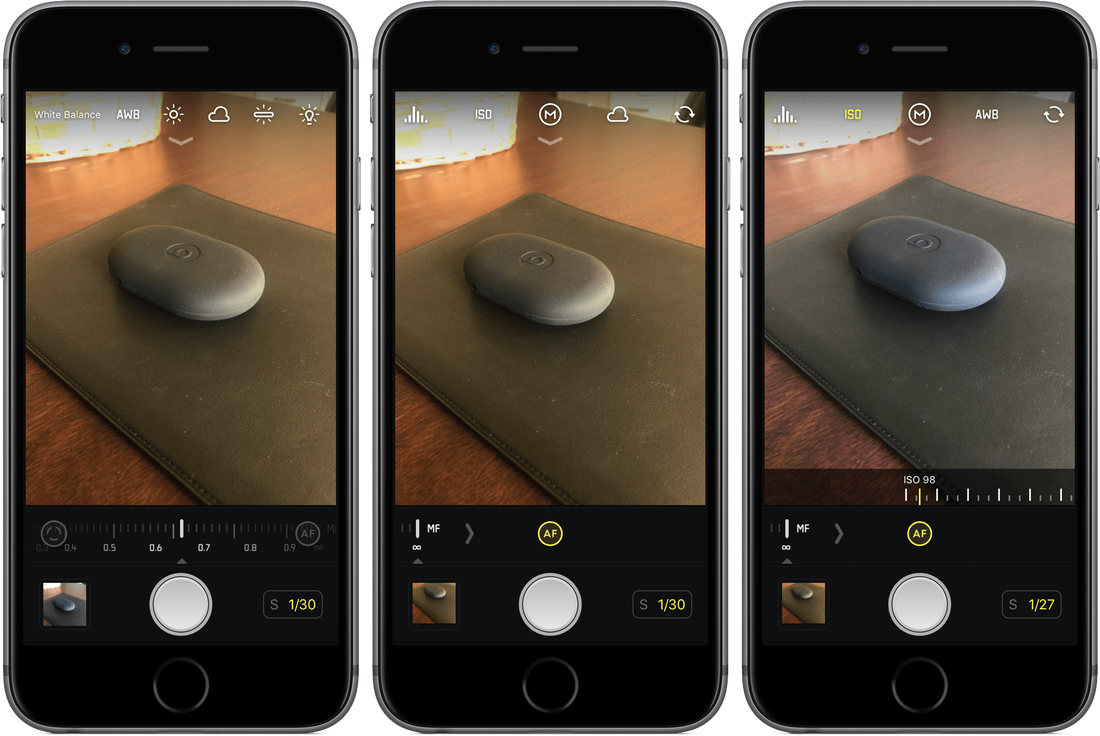
Check out the app HALIDE for iPhone which lets you use this stuff
|
Click below

|
|
